Snug Gown for Bedtime
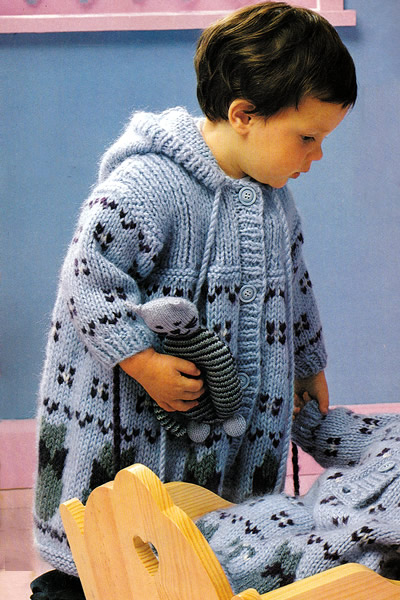
The cutest hooded gown made in a soft chunky yarn - perfect for bedtime, (or other occasions, as it is described as a "coat"). The lower section has a design of kittens - and there is a cute toy cat to match.
InstructionsThe pattern is given in 3 sizes: 12 (18
: 24) months. Where only one set
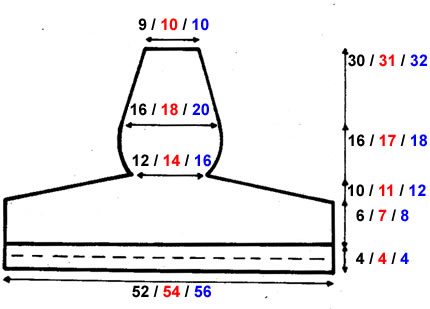
of instructions is given it applies to all sizes. SleevesWith 5mm needles and main colour (M), cast on 22 (24
: 26) stitches and work 3 (3
: 4) cm in k1/p1 rib, ending with
wrong side facing for next row. Now change to 6mm needles and stocking stitch following the Fair Isle colour pattern in the chart for the sleeve:
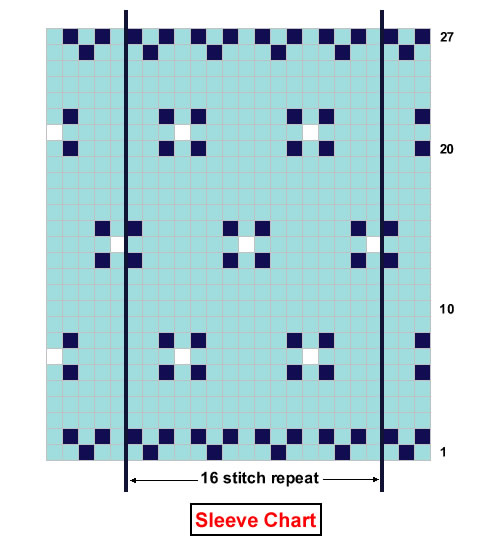
For the first size, begin with 1 stitch in black (B) then 1 in main shade
(M); for the second size, begin with 1M, 1B,
1M; for the third size, begin with 4M,
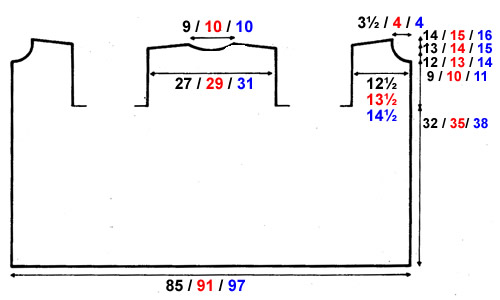
1B, 1M, 1B, 1M. Leave the stitches on a stitch holder or spare needle and work a second sleeve in the same way. Body (knitted as a single piece)Using size 5mm needles and main colour (M), cast on 113 (121 : 129) stitches and work 6 rows in garter stitch. Change to 6mm needles and work 2 (2 : 6) rows in stocking stitch. Continue stocking stitch and follow the Fair-Isle pattern working from the charts.

Work 2 rows as in Chart 1, commencing with 1M, 1B, then repeating the 8 stitch pattern across the row ending 1M, 1B, as indicated.
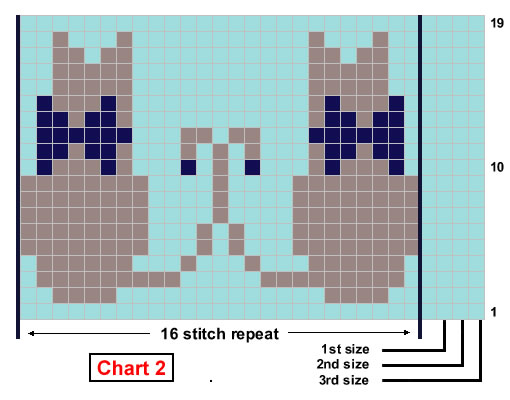
Now work the 19 rows of the cat pattern from Chart 2, 4 times across the row, placing 3 (5 : 7) stitches between each group, and working 2 (3 : 4) stitches in main shade before the first and after the last group.

Work 2 rows as in Chart 3, commencing with 2M, then repeating the 8 stitch pattern across the row ending 1B, 1M, as indicated. Work 4 rows in stocking stitch.
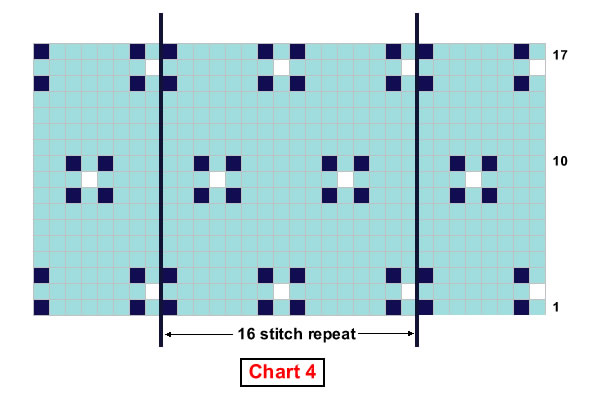
Work 4 rows in stocking stitch. Repeat the 2 rows as in Chart 3, as before, (commencing with 2M, then repeating the 8 stitch pattern across the row ending 1B, 1M, as indicated). Work 3 (2 : 2) rows in stocking stitch, and (wrong side facing) work 4 rows in garter stitch. At this point you have completed 58 (64 : 68) rows and your work should measure 32 (35 : 38) cm. Now you must divide the work and continue knitting the back and fronts separately. Change to 5mm needles and work in k1/p1 rib as follows, casting off some stitches for the armholes, as well as decreasing across the row. Next (right side facing, decrease) row:
k2, (p1, k1) 3 (3
: 3) times, p1, k2tog, (p1, k1) 2
(3 :
4) times, p1, k2tog, (p1, k1) 3 (3
: 3) times, k1; place these 23
(25, 27 ) stitches
on a spare needle or stitch holder...
Upper Left FrontNext row (wrong side facing): p2, * k1, p1, repeat from * to last stitch, p1. [23 (25 : 27) sts] With right side facing, continue in k1/p1 rib for a further 19 (21
: 23) rows, then shape the neck
as follows: cast off 3 (4
: 4) stitches on the next row, then
2 (2 :
2) on the following alternate row. Continue to decrease at the neck edge, and shape shoulders as
follows: Upper Right FrontRejoin yarn to the right front section at the front edge. Next row (right side facing): k2, * p1, k1, repeat from * to last stitch, p1. [23 (25 : 27) sts] With wrong side facing, continue in k1/p1 rib for a further 19 (21
: 23) rows, then shape the neck
as follows: cast off 3 (4
: 4) stitches on the next row, then
2 (2 :
2) on the following alternate row. Continue to decrease at the neck edge, and shape shoulders as
follows: Upper Back sectionWith wrong side facing, rejoin the yarn to the remaining stitches in
the centre. Work a further 26 (28 : 30) rows in k1/p1 rib. Now shape shoulders and back neck by casting off 5 (5 : 6) stitches at the beginning of the next row. Next row (wrong side facing): cast
off 5 (5 :
6) stitches, rib 15 (17
: 19) (including the stitch already
on the needle), cast off 7 stitches, and rib to end. This completes the right side of the Back neck. Rejoin the yarn to the remaining stitches at the neck edge and, right side facing, rib one row. Next row (wrong side facing): cast
off 5 (6 :
6) stitches, rib 10 (11
: 12) (including the stitch already
on the needle). This completes the left side of the Back neck. Button BandUsing 5mm needles, cast on 65 (71 : 77) stitches in main shade (B), and work in k1/p1 rib for 5 rows, keeping the 2 stitches at each end of the row in stocking stitch - like this: Next row: k2,
* p1, k1, repeat from *
to last stitch, k1. And so on for 5 rows in all. Purl one row, then knit 3 rows in stocking stitch using waste yarn of a different colour. Leave these stitches on a spare needle or holder. Make a second (right hand) band in the same way, adding 3 button holes on the 4th row: 4th row: k2,
p1, k1, cast off 2, rib 10 (12
: 13), cast off 2, rib 10 (12
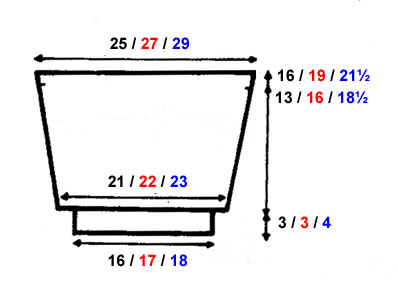
: 13), cast off 2, rib to end. Complete with 3 rows of waste yarn as before. HoodUsing 5mm needles, cast on 69 (73 : 75) stitches in main shade (B), and work in k1/p1 rib for 8 rows. Change to 6mm needles and work 11 (13
: 15) rows in stocking stitch. Wrong side facing, continue in stocking stitch, increasing 1 stitch at
each end of every 4th row 3 times. [21 (23
: 25) sts] Right side facing, continue in stocking stitch, decreasing 1 stitch at
each end of every 6th (6th
: 5th) row 3 (3
: 4) times. [15 (17
: 17) sts] To Make UpSew shoulder and sleeve seams up to the coloured markers. Sew the button band, stitch by stitch, to the right side of the work using back stitch, (undo the rows of waste yarn). Sew up the sides of the hood. Fold the front edge in half inwards and
sew round like a hem to make a channel to thread the cord through. Finish the buttonholes with embroidery if desired, and sew on buttons. |
Materials
|
MittensThis is a pattern for a very simple little pair of mittens in matching colours. The mittens are attached to a cord which is threaded through the armholes of a coat so that they can hang free at the ends of the sleeves if removed (and thus don't get lost). With 5mm needles and dark contrast colour (B), cast on 18 (18
: 20) stitches and work 3 cm in k1/p1
rib. Next row: k1, sl1, k1, psso, k4 (4
: 5), k2tog, sl1, k1, psso, k4 (4
: 5), k2tog, k1.
|
|
